1. Why Mould Is Rare—and Why Yeast Confuses Brewers
Kombucha fermentation creates an inhospitable environment for most moulds. Within the first few days, the symbiotic culture of bacteria and yeast—the SCOBY—produces enough acetic and lactic acid to drop the liquid's pH well below 4.0, a threshold at which common airborne moulds (Aspergillus, Penicillium, Cladosporium) struggle to germinate. By the time a new pellicle has begun to form, the brew is typically acidic enough to be self-protecting. This is why experienced kombucha makers can go years without ever seeing mould.
Yet yeast—a welcome, essential participant—looks decidedly uninviting to the uninitiated. Brown strands trailing from the underside of the SCOBY, cloudy sediment drifting through the tea, or a wrinkled, beige mass clinging to the jar wall can all trigger alarm. These formations are the work of Saccharomyces, Brettanomyces and other yeasts metabolising the sugars in your tea base. They are not only harmless; they are doing the job. The confusion arises because visual clues alone—colour, shape, even a slight fuzziness—overlap between benign yeast colonies and the early stages of mould. Learning to read texture, position and context is the key to confident diagnosis.
Acidity Is Your Safety Net
If your starter liquid tastes sharply acidic—pH 3.5 or lower—mould is almost impossible. Always reserve at least 10–15 % mature kombucha from your last batch to drop the pH quickly in the next.
2. What True Mould Looks Like: Colour, Texture and Position
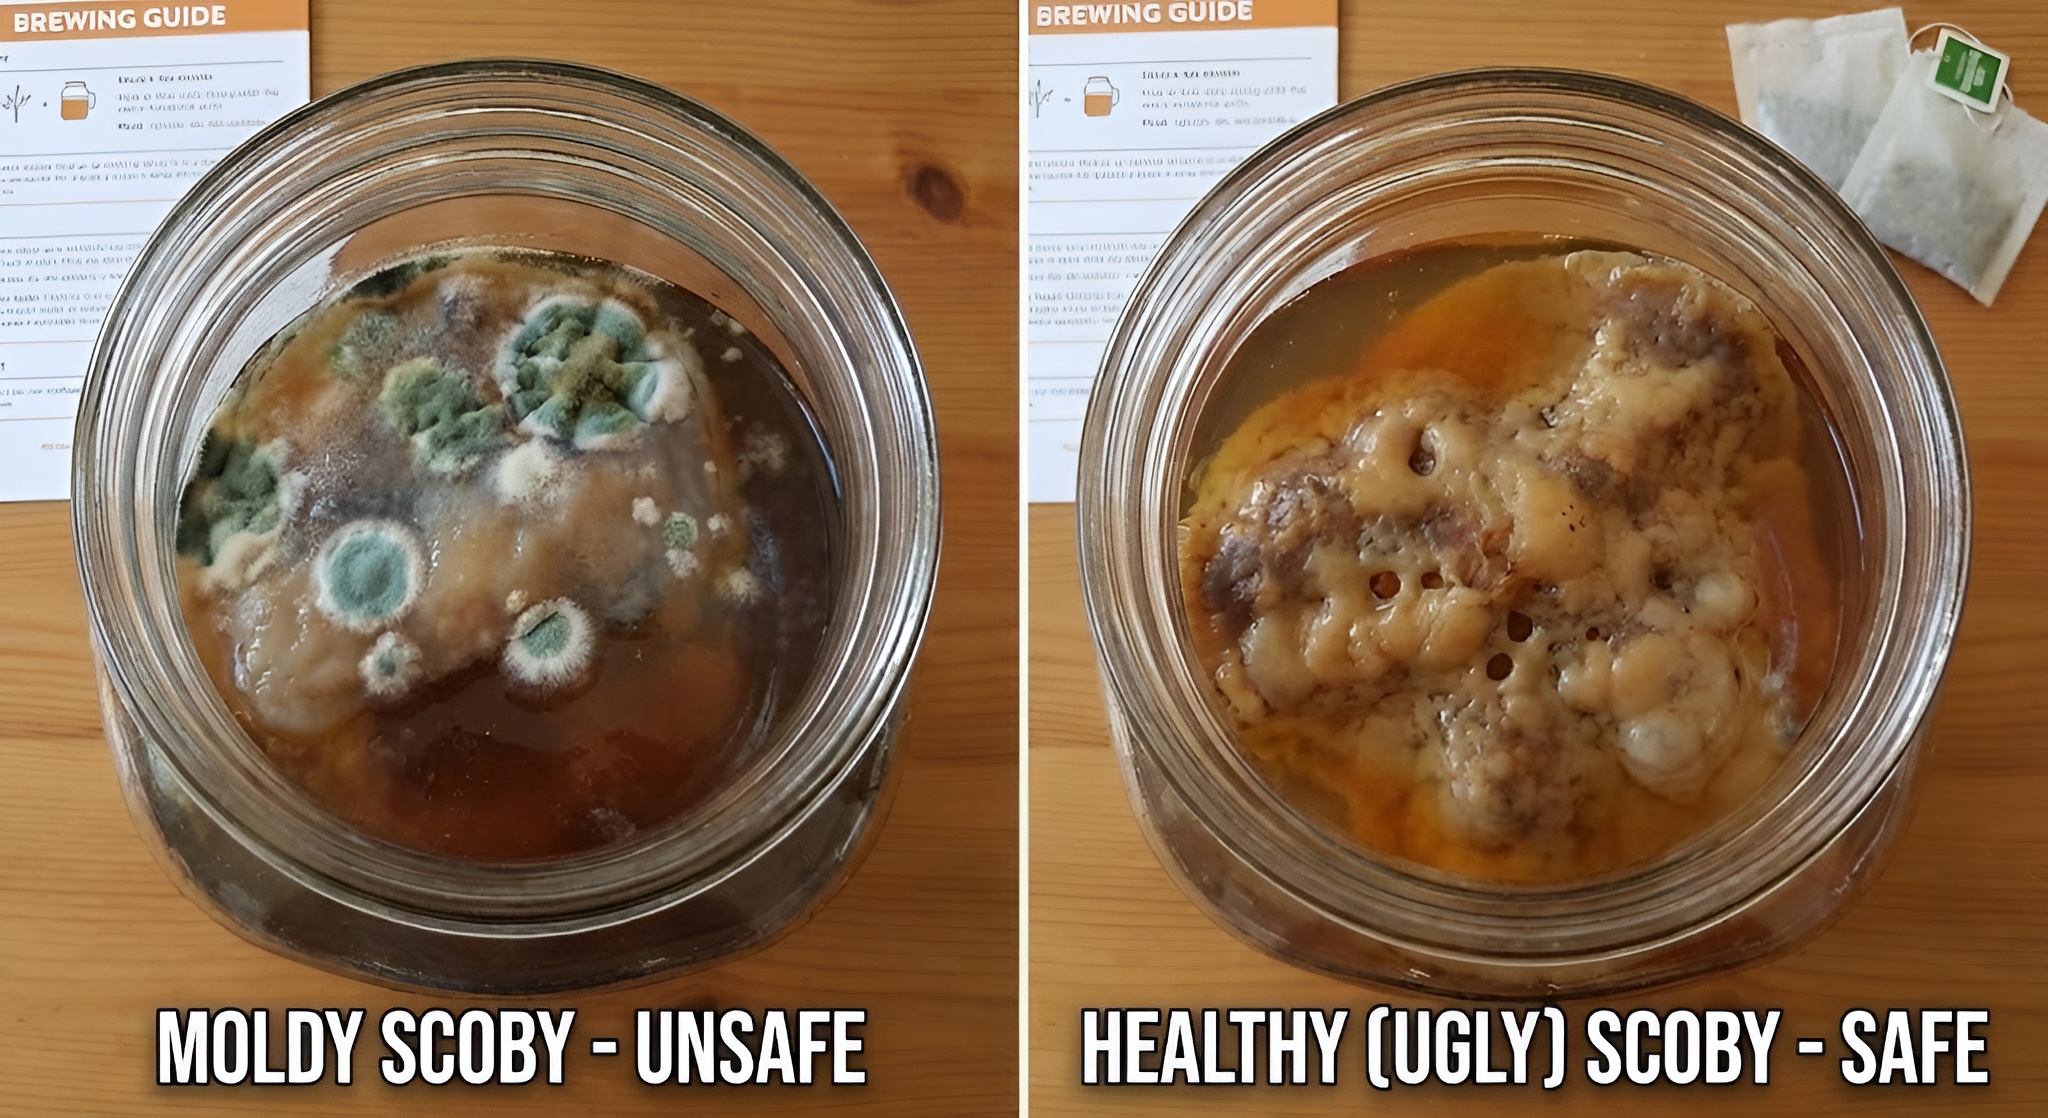
Genuine mould on kombucha presents as dry, raised colonies that sit on top of the liquid or pellicle surface, never submerged. The most common colours are blue-green (Penicillium), black (Aspergillus niger), white (various species) or pink (often Neurospora or wild yeasts that have gone rogue). The colonies typically measure a few millimetres to a centimetre across and have a fuzzy or powdery texture—if you were to touch one (not recommended), it would feel dry or chalky, like the mould on stale bread or a forgotten piece of fruit.
Mould almost always appears in the first three to five days, before the brew has fully acidified, and it favours spots where the pellicle is thin or where a gap in the cover has allowed a concentration of spores to land. It may initially look like a small, innocuous white dot, but within 24–48 hours it will expand into a visible tuft. Crucially, mould does not blend into the liquid; it sits proud of the surface and remains distinct, even as the SCOBY thickens around it. If you tilt the jar, mould stays put; yeast and sediment swirl or settle.
3. What Normal Yeast Looks Like: Strands, Blobs and Sediment
Yeast formations in healthy kombucha are submerged or dangling beneath the pellicle, and they are always wet. The most common manifestation is long, stringy tendrils—tan, brown or off-white—hanging from the underside of the SCOBY like jellyfish tentacles. These are yeast colonies clinging to cellulose fibres secreted by the acetic-acid bacteria. They are gelatinous to the touch and will drift or break apart if you swirl the jar.
You may also see cloudy sediment collecting at the bottom of the vessel, especially in brews that use black tea or are fermenting in warmer conditions. This sediment is a mix of spent yeast cells, tea solids and bacterial cellulose fragments. It is harmless and can be left in the jar or strained out before bottling. Another normal feature is a thin, wrinkled yeast raft that occasionally forms on the surface—often mistaken for mould—but which is smooth or slightly crinkled, cream to light tan in colour, and never dry or fuzzy. This is sometimes called kahm yeast, and while it can impart a musty flavour if left unchecked, it is not dangerous. Simply skim it off with a clean spoon and ensure your next batch has a lower starting pH.
The Swirl Test
Gently rock the jar. Yeast strands will wave and drift; mould colonies remain fixed on the surface. This simple movement reveals the difference instantly.
4. The Fuzzy Texture Test and the Smell Check
When visual inspection leaves you uncertain, texture and smell offer the final verdict. Mould is dry and raised; if you were to touch it with a sterile spoon, it would resist or flake rather than smear. Yeast, by contrast, is slimy and slippery—it will slide off a spoon or dissolve into the liquid. In practice, you should avoid touching suspect growths with anything that might cross-contaminate your equipment, but observing how a spot behaves when you tilt the jar or nudge it with a straw is often enough.
Smell is equally diagnostic. Healthy kombucha smells vinegary, fruity or faintly floral, depending on the tea and fermentation stage. Mould introduces off-notes: musty, damp-cardboard, paint-thinner or cheese-like aromas that are immediately unpleasant. If you are brave enough to take a tiny sip from below the surface (never swallow a mouthful if you suspect contamination), mouldy kombucha will taste flat, sour in the wrong way, or actively revolting. Trust your nose and palate; they evolved to warn you of spoilage.
5. When to Discard—and What to Throw Away
If you confirm mould—fuzzy, coloured, dry patches on the surface—discard the entire batch without hesitation. That means the liquid, the pellicle, any floating SCOBY layers and the cloth or paper cover. Do not attempt to scrape off the visible mould and continue brewing; by the time you see the colony, microscopic spores have spread through the liquid and cellulose matrix. Consuming or re-using any part of a mouldy batch risks ingesting mycotoxins, some of which are heat-stable and will not be neutralised by the fermentation acids.
Thoroughly wash your fermentation jar with hot, soapy water, then rinse with dilute white vinegar or a weak bleach solution (one tablespoon per litre, followed by a thorough rinse). If you have a backup SCOBY hotel or reserve pellicle stored in mature kombucha, use that to start your next batch; if not, source a fresh SCOBY from a reputable supplier or a brewer whose culture is known to be healthy. Do not attempt to salvage a mouldy pellicle by rinsing or cutting away the affected area—once colonised, it is compromised throughout.
Keep a SCOBY Hotel
Store spare pellicles in a jar of mature kombucha in the fridge or a cool cupboard. If your main batch moulds, you have a clean backup ready to restart without delay or expense.
6. How to Prevent Mould: Acidity, Cleanliness and Temperature
The surest way to avoid mould is to start every batch with a generous measure of mature, acidic kombucha—at least 10–15 % of the new volume—so the pH drops below 4.0 within hours. This starter liquid, not the pellicle, is your true insurance; the cellulose mat is a by-product, not a required inoculant. If your kombucha takes more than a day to taste noticeably sour, your starter ratio is too low or your sugar concentration too high, both of which extend the window for airborne spores to germinate.
Cleanliness matters, but soap residue and chemical sanitisers can harm the culture. Rinse all utensils and jars with hot water and white vinegar, then allow them to air-dry. Avoid touching the inside of the jar or the liquid with bare hands; use clean wooden or stainless-steel spoons. Cover your fermenting jar with a breathable, tightly woven cloth—muslin, coffee filter or a dedicated kombucha cover secured with a rubber band—to permit gas exchange while excluding dust, fruit flies and larger particles that carry mould spores.
Temperature control is equally important. Fermentation below 18 °C slows acidification, giving moulds a longer opportunity to establish. Conversely, temperatures above 30 °C can stress the SCOBY and encourage unwanted organisms. The sweet spot is 20–26 °C; if your kitchen is cool, consider a heating mat to maintain consistency. Finally, avoid direct sunlight, which degrades tea polyphenols and can warm one side of the jar unevenly, and ensure good air circulation around the vessel. Stagnant, humid corners are mould's favourite haunts.
Seasonal Vigilance
Mould risk peaks in spring and autumn when indoor humidity rises and heating is intermittent. Check your brews more frequently during seasonal transitions and consider a dehumidifier if your home is damp.
7. Kahm Yeast and Other Borderline Cases
Not every surface film is mould. Kahm yeast appears as a thin, off-white to pale-grey pellicle with a wrinkled or brain-like texture. It sits on top of the liquid but is smooth or slightly bumpy, never dry or fuzzy. Kahm is more common in low-acid ferments (sauerkraut, pickles) but can appear in kombucha if the starter liquid was weak or the fermentation temperature unusually cool. It is not harmful, but it can impart a stale, dusty flavour.
If you spot kahm, skim it off with a clean spoon, increase your starter ratio for the next batch, and taste the liquid below. If it is pleasantly tart and smells normal, you can bottle and drink it; if the flavour is off, compost the batch and adjust your process. Another borderline case is a very thick, dark pellicle with irregular brown patches. This is usually concentrated yeast and oxidised tea polyphenols, not mould, especially if the patches are smooth and wet. When in doubt, refer back to the texture test: mould is dry and raised; everything else is damp and flexible.
8. Troubleshooting Common Mistakes and Myths
One persistent myth holds that a new white pellicle forming across the surface is mould. In fact, a fresh cellulose layer begins as a thin, translucent or white film—smooth, wet and gradually thickening over days. It may have bubbles trapped underneath or a slightly uneven surface, but it will never be fuzzy or dry. If you are unsure, leave it alone for 24 hours; mould will develop a visible texture, while a healthy pellicle will simply thicken and become more opaque.
Another common error is over-handling the SCOBY. Poking, flipping or moving the pellicle increases the risk of introducing contaminants and disrupts the protective acidic layer on the surface. Leave the culture undisturbed until fermentation is complete, then decant the liquid from below. Some brewers also worry about bubbles or carbonation during primary fermentation; these are normal signs of active yeast metabolism and have nothing to do with mould.
Finally, do not confuse tea sediment or tannin precipitate—cloudy wisps or dark specks—with contamination. These particles are polyphenols and proteins binding together as the pH drops, and they are harmless. If your brew looks murky but smells and tastes good, it is fine. Clarity improves during second fermentation and straining, and has no bearing on safety or quality.
Photography for Diagnosis
If you are uncertain, take a close-up photograph under natural light and compare it to reference images in online kombucha communities or this guide. Visual comparison is often clearer than verbal description.



Comments