1. What Is a Black Tea Oxidation Chamber and Why It Matters
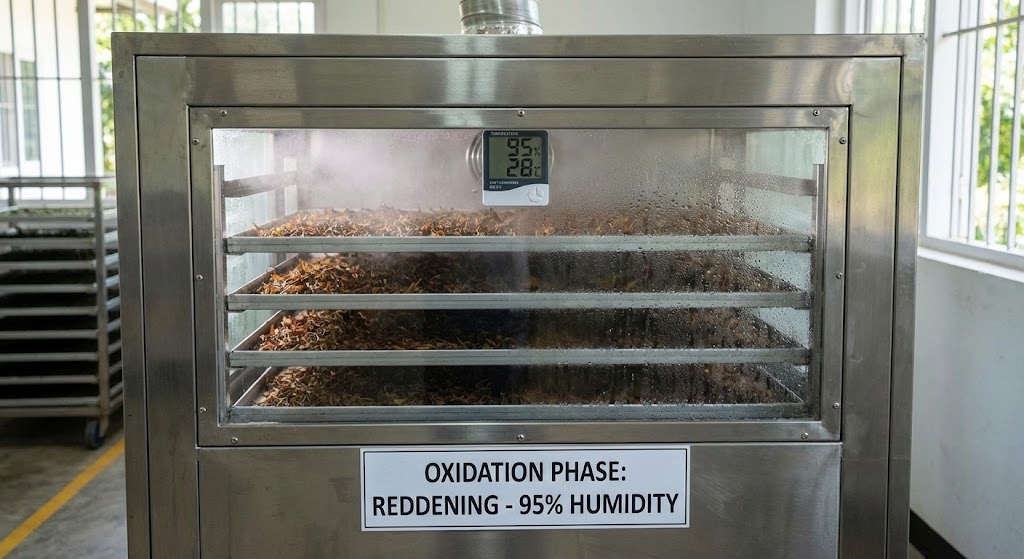
An oxidation chamber is any enclosed space where you can control temperature, humidity, and air circulation while freshly rolled tea leaf undergoes enzymatic browning. In commercial production—whether Assam orthodox factories or small-batch Yunnan workshops—this is typically a dedicated room with humidifiers, fans, and thermostatic controls. At home scale, a transparent plastic storage box (25–50 litre capacity), an insulated cooler, or even a large glass jar can serve the same purpose, provided you can monitor and adjust conditions.
Why the fuss? Oxidation is the defining transformation of black tea. When you roll the leaf, you rupture vacuoles and cell walls, mixing polyphenol oxidase enzymes with catechin substrates in the presence of oxygen. The resulting cascade produces theaflavins (brightness, astringency) and thearubigins (body, colour, sweetness). Temperature accelerates enzyme activity; humidity prevents the leaf drying out mid-process, which would halt oxidation prematurely. Without controlled conditions, you risk uneven oxidation—some leaves brown, others stay green—or over-oxidation, where excessive enzyme action strips flavour and leaves a flat, papery cup. A chamber gives you reproducibility and quality control, much like a proving drawer does for bread dough.
In the UK, where ambient temperature in spring and autumn often sits around 15–18 °C and relative humidity varies wildly, relying on open-air oxidation is unpredictable. A chamber insulates the process from your kitchen's microclimate, letting you hit the sweet spot of 24–26 °C and 90% RH regardless of weather. It also keeps the leaf clean—no curious insects, airborne dust, or drafts that dry the edges. If you're serious about home tea processing, or experimenting with partial oxidation for oolong, a DIY chamber is the single most impactful upgrade you can make.
Transparency Is Your Friend
Use a clear container so you can watch colour change without opening the lid. Every time you lift the cover, you lose humidity and disrupt the microclimate; visual monitoring through plastic or glass keeps conditions stable.
2. Sourcing and Preparing Fresh Leaf: Withering Essentials
Black tea starts with fresh Camellia sinensis leaf—ideally the terminal bud plus two or three young leaves, plucked in morning after dew has evaporated. In the UK you can grow your own plants in a polytunnel or sheltered south-facing bed (cultivars like 'Beni Hikari' and 'Benifuuki' tolerate our climate), buy fresh leaf from specialist nurseries during the growing season, or forage semi-wild specimens if you know provenance. Whatever the source, you need un-bruised, pest-free material; damaged leaf oxidises unevenly, and any mould spores present will proliferate in the humid chamber.
Withering is the first processing step and it's non-negotiable. Spread your fresh leaf in a single layer on bamboo trays, cotton muslin, or clean baking parchment in a cool, shaded room with gentle air movement—a fan on low speed a metre away is ideal. The goal is to reduce moisture content from roughly 75–80% down to 30–40% over 12–18 hours, leaving the leaf pliable and slightly leathery. You'll know it's ready when a leaf bent double doesn't snap along the midrib but folds smoothly. Under-withered leaf is too wet to roll efficiently and will steam rather than oxidise; over-withered leaf shatters, releasing fewer enzymes and yielding weak liquor.
Check progress every few hours, gently turning the pile to ensure even moisture loss. Ambient temperature matters: at 18–20 °C withering takes 14–16 hours; at 24 °C it may finish in 10–12. If your kitchen is warm and dry, mist the leaf lightly once or twice to slow the process. Some producers include a brief hard wither stage at higher temperature to kickstart enzymatic changes; at home, a consistent cool wither is simpler and less risky. Once withered, proceed immediately to rolling—delays allow the leaf to reabsorb moisture from the air or start oxidising unevenly.
3. Hand-Rolling to Rupture Cells and Activate Enzymes
Rolling physically breaks the leaf's cell structure, releasing polyphenol oxidase and peroxidase enzymes that drive oxidation. In factories this is done by cylindrical roller machines; at home, your hands (or a sturdy rolling pin on a wooden board) do the job. Take a handful of withered leaf—about 30–50 g—and roll it firmly between your palms as if forming a clay snake, applying steady pressure for 30–60 seconds, then unfurl and repeat. Alternatively, spread the leaf on a clean chopping board and use a rolling pin with firm, even strokes, gathering and re-rolling every minute.
Aim for 10–20 minutes of total rolling time per batch. You'll see the leaf darken slightly and feel it become tacky as cell sap emerges; some batches will release visible juice. This is good—it means enzymes and substrates are mixing. If the leaf starts to dry out, mist very lightly with a spray bottle; if it feels wet and slippery rather than tacky, your wither wasn't long enough and you risk a grassy, under-oxidised result. The degree of rolling affects final character: light rolling (short duration, less pressure) favours a brighter, more astringent cup; heavy rolling (longer, more pressure) produces fuller body and darker liquor, closer to CTC or broken-leaf styles.
Some home processors roll in stages—5 minutes, rest for 10 minutes under a damp cloth, then 5 minutes more—to allow partial oxidation between passes. This mimics the orthodox method and can yield more complex flavour. If you're processing a large quantity, work in small batches and keep finished, rolled leaf under a damp cotton cloth in a tray while you finish the rest; this maintains humidity and prevents premature drying, but don't leave it longer than 30 minutes or oxidation will begin unevenly before you transfer to the chamber.
Listen for the Squeeze
Well-withered leaf makes a subtle creaking sound as you roll, like compressing damp paper. If it's silent and slippery, wither longer; if it crackles or shatters, you've over-withered and enzyme release will be poor.
4. Building Your DIY Oxidation Chamber: Equipment and Setup
A functional home oxidation chamber requires four components: an enclosure, a hygrometer, a thermometer, and a means of maintaining humidity. For the enclosure, a 30–50 litre clear plastic storage box (widely available at UK hardware and homeware retailers for £8–15) works well. Choose one with a tight-fitting lid and at least 20 cm depth so you can spread leaf in a shallow layer on a raised rack—a bamboo sushi mat, wire cooling rack, or perforated plastic tray—allowing air to circulate underneath.
Fit a digital hygrometer-thermometer combo unit (£10–20 online, models with remote probes are convenient) inside the box, positioning the sensor near the leaf layer. Your target environment is 22–28 °C and 85–95% relative humidity. To achieve and hold that RH, line the bottom of the box with a folded damp tea towel or place a shallow dish of warm water beneath the rack; for larger batches or drier kitchens, a small USB-powered ultrasonic humidifier (£15–25) placed inside or fed through a hole in the lid works brilliantly. Avoid over-humidifying—condensation dripping onto the leaf encourages mould and uneven oxidation.
For temperature control, place the sealed chamber in a warm spot: near (not on) a radiator, atop a fridge, or inside an oven with just the pilot light or oven light on. Some home processors use a seedling heat mat (£15–30, available at garden centres) beneath the box to maintain a steady 24–26 °C. Monitor temperature and humidity every 15–20 minutes during the first hour—small adjustments (cracking the lid briefly to release excess moisture, adding a hot-water bottle wrapped in a towel to raise temperature) are easier early on. Once stable, the chamber will coast for the 1–3 hour oxidation window with minimal intervention.
The Oven-Light Trick
A domestic oven with just the interior light on typically holds 24–28 °C—perfect for oxidation. Place your chamber inside (door closed), check temperature after 20 minutes, and adjust by cracking the door slightly if needed. Free, stable, and no extra kit required.
5. Monitoring Oxidation: Timing, Colour, Aroma, and Enzymatic Activity
Once your rolled leaf is spread in a thin, even layer inside the chamber and conditions are stable, oxidation begins immediately. At 24–26 °C and 90% RH, expect the process to take 1.5–3 hours for full black-tea oxidation; cooler or drier conditions extend the window, while warmer or more humid environments accelerate it. The enzymatic reactions are temperature-dependent: polyphenol oxidase activity peaks around 30 °C but begins to denature above 35 °C, so avoid over-heating.
Judge progress by colour, aroma, and uniformity. Freshly rolled leaf is olive-green or khaki; after 30 minutes it shifts to coppery-brown; by 90 minutes it's deep reddish-brown; at 2–3 hours, dark chocolate brown with occasional blackish edges. Aroma evolves from grassy and vegetal through fruity-floral (stone fruit, sometimes honey or citrus, reminiscent of bug-bitten teas) to rich, malty, and bready. Lift the lid briefly every 30 minutes to assess—trust your nose as much as your eyes. If the scent turns sour, alcoholic, or musty, oxidation has stalled or contamination is setting in; if it smells flat and papery, you've over-oxidised.
Uniformity is critical: every leaf should show similar colour. Patchy oxidation—some green, some brown—indicates uneven rolling, insufficient humidity, or clumping. Gently fluff and redistribute the layer if you spot this in the first hour. Most home processors prefer to halt oxidation slightly earlier rather than later; you can always re-oxidise under-processed leaf in a second session, but over-oxidation is irreversible and yields harsh, astringent liquor. For your first few batches, err on the side of 1.5–2 hours and taste the result; you'll quickly calibrate to your preferred style.
6. Halting Oxidation: Firing and Drying Techniques for Home Use
Oxidation must be stopped decisively by denaturing the enzymes with heat—this step is called firing, kill-green (though that term usually applies to green tea), or drying. In a professional context this happens in large drum dryers or fluid-bed driers at 90–130 °C; at home, your domestic oven or a large wok over moderate heat will suffice. Spread the oxidised leaf in a single layer on a baking tray lined with parchment, set your oven to 100–120 °C (fan setting if available, or conventional with the door slightly ajar), and fire for 10–20 minutes, stirring gently every 3–5 minutes to ensure even heating.
The leaf is done when it's dry, brittle, and no longer aromatic in a grassy or vegetal way; you should be able to crumble a piece easily between finger and thumb. If it still bends or feels leathery, continue firing in 3-minute increments. Be cautious: over-firing (above 130 °C or too long) can scorch the leaf, introducing burnt, bitter notes; under-firing leaves residual moisture that invites mould during storage. A final moisture content of 3–5% is ideal—difficult to measure precisely at home, but a well-fired leaf will rattle faintly when shaken in a tin.
Wok firing is traditional and gives more control but requires constant attention: heat a dry wok to medium-high, add a handful of leaf, and toss continuously for 3–5 minutes, reducing heat if you see smoke or smell burning. Repeat in small batches. Some UK home processors use a countertop convection oven or air fryer set to 110 °C, which works well for small quantities. Once fired, spread the leaf on a tray and let it cool completely—residual heat can continue cooking—then transfer immediately to an airtight tin or jar for a 24-hour rest before your first tasting. For long-term storage guidance, see our complete storage guide.
The Snap Test
A properly fired black tea leaf will snap cleanly rather than bend. If it bends or feels spongy, return it to the oven for another 5 minutes; if it crumbles to dust at the slightest touch, you've over-dried and may lose some aromatics.
7. Understanding Oxidation Variables: Temperature, Humidity, and Time
Three interdependent variables govern oxidation speed and character: temperature, relative humidity, and time. Raising temperature from 22 °C to 28 °C roughly halves oxidation time, because enzyme kinetics follow an exponential curve; oxidation rates and temperature are intimately linked. However, higher temperature also shifts the balance of reaction products—more theaflavins (brightness, astringency) at the expense of thearubigins (body, sweetness). Cooler oxidation (20–22 °C over 3–4 hours) tends to preserve more floral and fruity volatiles, yielding a tea closer in profile to Darjeeling or high-altitude Himalayan blacks; warmer, faster oxidation (26–28 °C, 1.5–2 hours) produces a maltier, more robust cup reminiscent of Assam or Yunnan Gold.
Humidity's role is to keep the leaf supple and enzymes active. Below 80% RH, the leaf surface dries and oxidation stalls at the edges, leading to uneven colour and flavour; above 95% RH, you risk condensation and unwanted microbial activity—moulds and bacteria thrive in saturated air. The sweet spot, 85–95%, maintains enzyme activity without introducing spoilage risk. If you're experimenting with partial oxidation for oolong-style teas, you might deliberately cycle humidity or introduce brief drying phases between rolling stages; for straight black tea, hold it steady.
Time is the dependent variable: once you set temperature and humidity, oxidation duration follows. Keep detailed notes for each batch—cultivar, wither duration, rolling time, chamber conditions, oxidation time, and tasting impressions—and you'll quickly identify your preferred parameters. Many home processors find that 24 °C, 90% RH, and 2 hours is a reliable starting point for a balanced, drinkable black tea; from there, adjust one variable at a time to dial in your house style.
8. Troubleshooting, Safety, and Scaling Up: Common Pitfalls and Solutions
Mould is the most common safety concern. If you see white, grey, or coloured fuzz on the leaf at any stage, discard the entire batch—don't risk it. Mould spores germinate in stagnant, over-humid conditions; prevent this by ensuring air circulation (don't pack leaf too densely), keeping RH below 95%, and maintaining temperature above 20 °C (cold, damp air is mould's friend). If your chamber smells musty rather than fruity-malty, open it immediately, reduce humidity, and increase temperature slightly. Clean all equipment—trays, racks, the chamber interior—with dilute white vinegar and dry thoroughly between batches.
Uneven oxidation—some leaves green, others brown—stems from inadequate rolling, clumping in the chamber, or poor air circulation. Roll smaller batches more thoroughly, spread leaf no more than 2 cm deep, and gently fluff the layer halfway through oxidation. Flat, astringent tea usually means over-oxidation: enzymes have exhausted their substrates, leaving only harsh polyphenols. Shorten oxidation time by 30 minutes next batch. Grassy, under-developed tea points to insufficient oxidation or premature firing; extend chamber time or check that your hygrometer is reading accurately (cheap units can drift ±10% RH).
Once you're confident, scaling up is straightforward: use a larger chamber (a 90-litre storage box or insulated coolbox), process leaf in 100–200 g batches, and maintain the same environmental parameters. Some UK home processors build semi-permanent chambers from old wine fridges or repurposed catering hot-boxes, fitted with temperature controllers and ultrasonic humidifiers. For those interested in other processing techniques, our guides to green tea, roasting, and smoking tea at home offer complementary methods. If you're blending your finished black tea with other ingredients, see our home blending guide. Finally, if you'd rather taste professionally processed examples before committing to DIY, discovery samplers offer an affordable way to calibrate your palate against estate benchmarks.
Keep a Batch Log
Record every variable—wither time, roll duration, chamber temp/RH, oxidation time, firing temp—and your tasting notes. After half a dozen batches you'll spot patterns and dial in your signature style far faster than guessing batch-to-batch.



Comments